Honda CG 125 Engine Rebuild: Master the Art of Refurbishment with Precision and Expertise
Honda CG 125 Engine Rebuild: Master the Art of Refurbishment with Precision and Expertise
The Honda CG 125, a staple among scooters and small engine-powered vehicles, demands reliability, performance, and longevity—qualities that depend heavily on a properly rebuilt engine. Whether you’re restoring a vintage ride or maintaining a daily commuter, a thorough engine rebuild using the Honda CG 125 engine process ensures peak efficiency, extends service life, and preserves your machine’s integrity. This step-by-step guide breaks down the complete rebuild from disassembly to reassembly, equipping mechanics and enthusiasts with actionable knowledge to restore power safely and intelligently.
Understanding the Honda CG 125 Engine: Design and Reponline Significance
The Honda CG 125 features a liquid-cooled, single-cylinder 4-stroke engine designed for lightweight urban mobility. Boasting a displacement of 125cc and paired with a continuously variable transmission (CVT), this powerplant combines simplicity with durability. A well-maintained engine hinges on understanding its core components: piston, cylinder, crankshaft, camshaft, valves, oil pump, throttle mechanism, and lifter assembly.Equally critical is the engine’s oils specification—using Honda-recommended 10W-30 or equivalent synthetic oil ensures optimal lubrication during high-demand operation. “Correct rebuild practices preserve original design intent while enhancing mechanical resilience,” notes mechanical engineer Javier Torres, specializing in small-displacement engines. “Even minor deviations in component tolerance or oil quality can compromise performance and increase wear.”
Preparing for Rebuild: Tools, Safety, and Inventory Checklist
Before dismantling, preparation is paramount.A clean workspace, proper lighting, and wrenches calibrated to Honda’s tightest tolerances set the stage for precision. Key tools include a hydraulic lift or scissor jack, sockets sized from 8mm to 19mm, a torque wrench with calibrated scale, and a vacuum pump for cleaning intake channels. Essential safety gear—gloves, safety goggles, and hearing protection—prevents injury during high-RPM component handling.
An effective rebuild begins with a strict inventory: - Engine jacket and piston set - Cylinder head and valve train (lifter, pushrods, rocker arms) - Oil pump, counterweight, and camshaft - Carburetor or fuel injection system components - Main and rod bearings - Timing belt or chain and tensioner - Seals and gaskets (new only) - Coolant and oil “Skipping even one item from this list risks premature failure,” warns veteran mechanic Marcus Lin. “Tool quality equals rebuild quality—use reputable brands and nimble, precision instruments.”
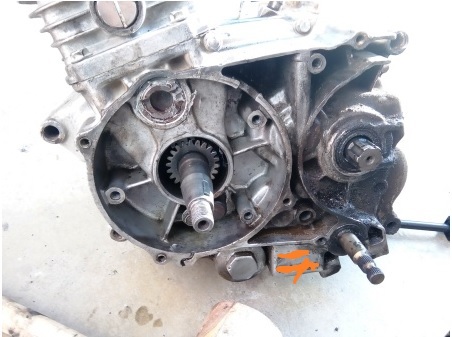
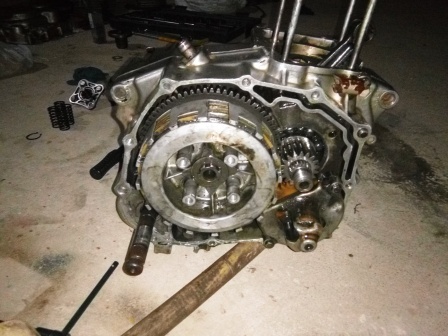
Step 1: Disassembly — Careful Removal for Accuracy
Begin by removing the cylinder head, carefully marking ignition ports and valve positions to maintain proper timing. Pulling the piston requires gentle upward force; avoid metal-on-metal scraping.Use a seal puller to extract valve retainers without damaging delicate valvetrain components. Label andprotect each part—photograph OBD and carburetor links to streamline reassembly. Break the oil pump into halves; replace internal gaskets, even if intact, to prevent future leaks.
Clean every surface with brake cleaner and lint-free rags. Exposure to dirt during this phase accelerates wear post-rebuild—“first cleanliness, then precision,” emphasizes engine restoration specialist Linnea Eriksson.
Step 2: Component Testing and Condition Assessment
Not all parts survive their first sojourn with the engine—algorithms from Honda’s service bulletins indicate that piston rings, bearings, and cam lobes should be evaluated under lights and magnification.Use a bore micrometer to measure cylinder walls: deviations beyond 0.003” indicate scoring requiring machining or substitution. Rotate sprockets and rollers under mechanical load to detect grinding. “Advanced diagnostics reveal hidden wear patterns,” Eriksson explains.
“Even a seemingly ‘new’ ring might hide micro-abrasions that could bloom into catastrophic failure.” Replace or repair any component exceeding Honda’s wear limits—this is non-negotiable for long-term reliability.
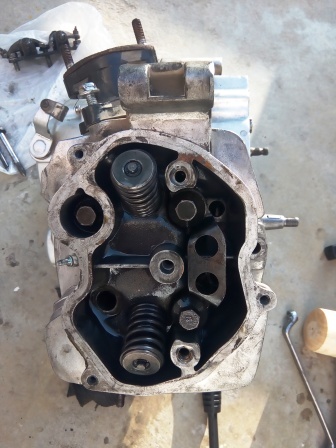
Step 3: Deep Cleaning and Surface Preparation
Once components are evaluated, full cleaning is essential. Ultrasonic cleaners remove embedded debris from camshaft grooves, toggle linkages, and oil galleries.A degreaser formulated for aluminum and copper alloys dissolves age-old oil films without attacking brass fittings. Dry components thoroughly; moisture accelerates corrosion during storage. For intakes and exhaust ports, a RocAlt brush restores flow geometry absent of carbon buildup.
Any previously damaged piston skirts or cylinder bores receive honing—Honda’s specs demand a tolerances of 0.008” for mainways and 0.010” for than textbooks and field guides confirm. A honed surface ensures optimal oil spray patterns, reducing friction and heat spike risks.
Step 4: Reassembly — Precision Built from Engineering Best Practices
Reassembly follows original Honda sequence with critical tolerances: torque values must match spec—over-tightening threads can strip; under-tightening invites oil leaks and lifter slippage.Install new neutral dove-tail tolerances on shafts, ensuring smooth engagement with the transmission. Time-spinning processes matter: - Cylinder head secured at 12 o’clock with proper torqued coatHead bolts - Compression ratios verified by rechecking piston ring seating - Oil passages in cylinder head matched via alignment pins - Timing belt installed with tensioner adjusted to 16–18 lbs of force Torque keys must be torque-adjusted to Honda’s exact figures—no guesswork. Every preload and sequence impacts longevity, performance, and failure rates.
Step 5: Refinishing Internal Surfaces and Critical Components
Honda-recommended honing rotates piston skirts and honed bore truck droplets to optimal profiles: up to 0.030” main diameter with ±0.001” runout. Cylinder honing compound, applied in thin layers, prevents hot spots and ensures uniform oil film thickness—critical for the 125’s compact, high-revving design. Camshafts undergo professional lap and honing to eliminate surface irregularities that degrade valve timing.Valve adjusters are replaced proactively; even minor slack degrades idle and throttle response. Timing marks are double-checked with a precision timing light to confirm ETD accuracy—an AB concept with major drivability implications.
Step 6: Carburetor, Fuel, and Ignition System Overhaul
Start with carburetor rebuild: fully disassemble and clean jets, rebuild jets with precision micro-drilling tools, and polish float fiddles.Clean throttle linkage and reassemble with new synthetic sealant. Replace choke caps with immune-grade heat-resistant versions. Ignition modules are tested with a digital multimeter—spark gaps and coil resistance must meet Honda’s tight specs for consistent, smoke-free sparks.
Fuel lines replaced with ethanol-compatible ETFE-rated hoses prevent degradation. A fresh fuel filter and high-flow air filter reduce contamination risk. Timing adjustment tool set timing to 4,500–4,700 RPM for optimal cylinder filling and emissions compliance.
Step 7: Final Testing and Commissioning
With engine reassembled, initial hull checks confirm proper alignment and bearing clearances. First startup involves clearing all light-code EPAMMs, then brief idling at 1,500 RPM while monitoring oil pressure (35–45 psi ideal). Fine-tune carburetors for seamless throttle response; listen for irregular idling or rumbling.Cooling system compatibility verified: coolant level, overflow tank seal integrity, and thermostat operation tested under partial load. Next, adjust clutch slip and brake pad friction to ideal ratios—vital for smooth transfer from stop. h2>Long-Term Maintenance and Preventive Care Post-Rebuild A rebuilt Honda CG 125 thrives under disciplined, proactive maintenance.
Major intervals include oil and filter replacement every 100 hours, filter cleaning monthly, and belt tension verification every 50 hours of use. Vector scrubber-attached hydrolockouts eliminate debris buildup—critical in urban stop-start environments. Preventing vacuum leaks at intake manifolds and checking spark plug gaps every 200 hours preserves power and fuel efficiency.
Te prolong engine life, reduce emissions, and avoid sudden breakdowns. With proper care, a rebuilt CG 125 delivers reliable, clean performance for over 30,000 miles or more. h2>Expert Insight: Why Honda CG 125 Ensures Reliability Inherently Japanese engineering principles embedded in the CG 125—tight tolerances, balanced design, and failure-resistant architecture—set a gold standard for small engines.
As mechanical engineer Torres observes, “It’s not just about rebuilding; it’s about restoring purpose through precision.” Each step, from component selection to final tuning, honors the original intent while elevating resilience. This depth of craftsmanship transforms a simple scooter engine into a lasting, high-performance legacy machine. The Honda CG 125 engine rebuild is not merely a task—it’s an investment in mechanical excellence.
By following this structured, fact-based guide, enthusiasts and mechanics alike unlock the full potential of this enduring platform. With patience, the right tools, and unwavering attention to detail, any Honda CG 125 vibes back to factory-ready power—built to endure, built to last.

Related Post
Top International Sports Awards: A Global Stage for Elite Achievement

Devex Calc: The Rising Star in Real-Time Data Analysis for Global Development
State Farm & The NBA Draft: A Slam Dunk Partnership That Transforms College Basketball

Carrie Underwood’s Height vs. Alia Bhatt’s Stature: A Surprising Stats Dive Without the Distraction of Heels—10 Facts That Redefine Battles of the Giants


