Master Kawasaki Mule PRO-FXT Fuel Filter Access with the Ultimate Location Guide
Master Kawasaki Mule PRO-FXT Fuel Filter Access with the Ultimate Location Guide
For off-road adventurers and retail-powered Kawasaki Mule PRO-FXT riders, maintaining engine longevity begins with one critical yet often overlooked step: access to the fuel filter. The Kawasaki Mule PRO-FXT Fuel Filter Location Guide offers a precise, step-by-step blueprint for locating and replacing this essential component, ensuring reliable performance and extended engine life. By demystifying the filter’s placement, pro riders and enthusiasts alike gain the confidence to perform timely maintenance without diagnostic headaches.
This guide isn’t just about hiding pipe and pan—it’s about empowering smarter, safer service under the trail or shop floor.
The Fuel Filter: Hidden Key to Engine Durability
Tucked away in the lower engine housing, the fuel filter plays a silent but vital role: it guards the fuel system against contaminants, ensuring clean fuel reaches the combustion chamber. For the Kawasaki Mule PRO-FXT—a machine built for rugged terrain and demanding loads—the filter’s condition directly affects fuel efficiency, engine stability, and long-term reliability. Misjudging its location risks drilling costly downtime or damaging the fuel system.
According to Kawasaki service standards, timely filter replacement is among the most effective preventive maintenance actions a rider can perform.
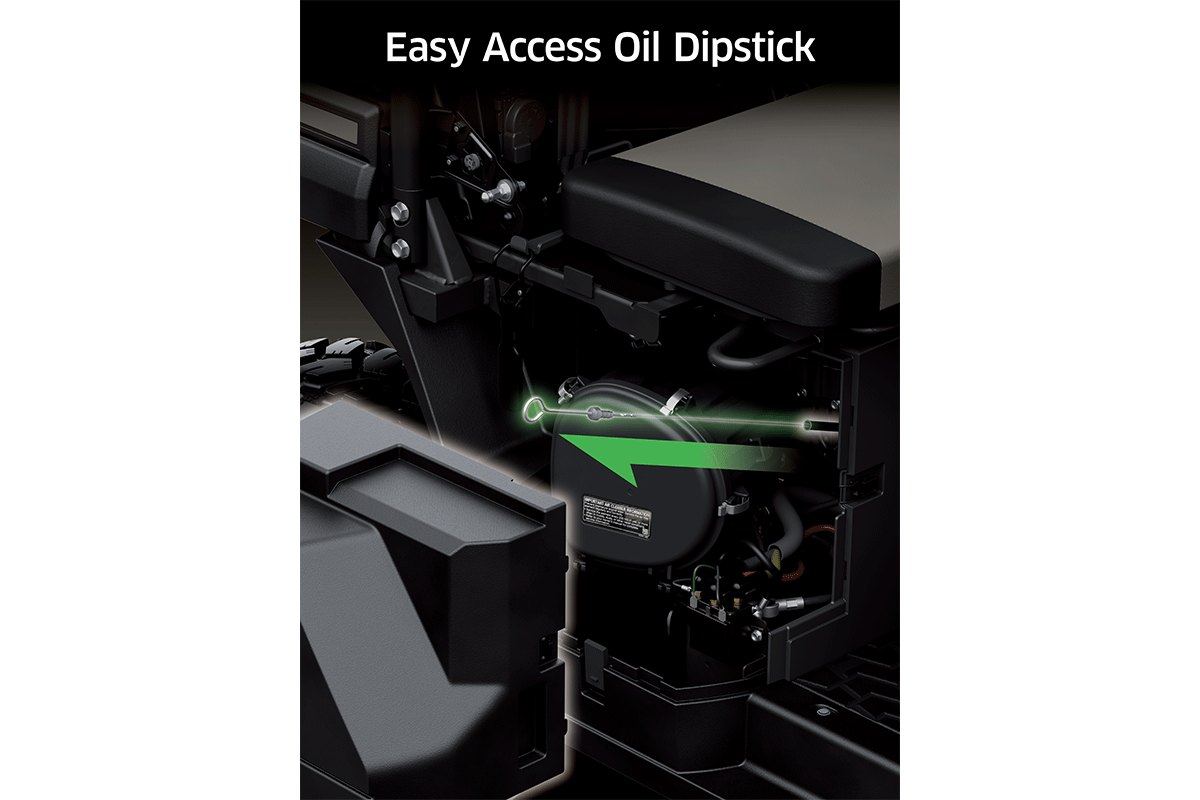
Where Exactly Is the Kawasaki Mule PRO-FXT Fuel Filter?
Unlike components boldly mounted on the frame, the fuel filter resides in an often-surprising location: underneath the motorcycle, nestled within the engine base. The Kawasaki Mule PRO-FXT Fuel Filter Location Guide identifies three primary anchor points—each strategic and practical for service access. First, the filter is mounted beneath the fuel tank, where it draws fuel from the main reservoir.
This central placement simplifies installation and removal, minimizing invasive disassembly. Second, modern versions integrate a mid-engine routing: fuel lines run from the tank, through the air filter housing, across the frame rail, and into a compact filter housing installed just below the exhaust plume. This design reflects Kawasaki’s efficient use of space.
Third, a secondary access point appears in service kits: a removable panel beneath the seat beam, offering utility even when the bike rests in high-traffic storage. Each location balances ease of use with real-world constraints of vibration, clearance, and rider safety.
Step-by-Step Access: Practical Steps from the Kawasaki Mule PRO-FXT Fuel Filter Guide
For riders navigating this hidden component, the guide delivers a clear workflow:
- Position the bike securely on level ground with hydraulic pumps disengaged to prevent fluid shift.
- Locate the filter by following the fuel return line downward from the tank—its cylindrical housing, typically secured by two bolts, is visible through access panels or by following residual wiring in newer models.
- Before disconnecting lines, ensure the engine cools completely; petroleum products remain hot and volatile under heat.
- Use compatible wrenches to loosen retaining nuts, carefully lifting the filter housing away from the engine mounts.
- Remove the old filter and install the new unit, verifying seal integrity with manufacturer-grade gasket materials.
- Reconnect fuel lines with torque specs in mind—over-tightening risks cracking rare alloy components.
Common Challenges and How the Guide Solves Them
Despite clear instructions, earlier service attempts reveal recurring hurdles: restricted-space access due to tight mounts, stubborn bolts seized by rust, and misidentified filter locations in aftermarket chassis.
The Kawasaki Mule PRO-FXT Fuel Filter Location Guide directly addresses these pain points: - **Tight Mounts:** Diagonal access angles and universal adapter torque tools are referenced to prevent diffusion damage. - **Rusted Connections:** Pre-lubrication techniques with high-temperature Zap-Brite Rust Cutter and insulated thread seals are emphasized. - **Location Confusion:** High-resolution schematics differentiate OEM vs.
aftermarket positions, with QR-code links to 3D rotational views in the full guide. Each solution reinforces operational safety and reduces service errors, proving the guide’s value beyond mere documentation.
Why Timely Filter Replacement Matters
Retrieving the filter location isn’t just a technical exercise—it’s a gateway to proactive engine care.
The Kawasaki Mule PRO-FXT’s fuel system, pressurized and exposed to dirt and moisture, demands vigilance. A clogged filter restricts flow, causing air-gapping, power loss, and erratic idle. More critically, unfiltered debris can clog injectors or fuel pumps, triggering expensive repairs.
By pinpointing the filter’s true location, riders can schedule replacements during routine tune-ups, avoid performance setbacks, and preserve engine value. As a leading off-road mechanic notes: “You don’t fix what you can’t see—and the filter’s location is the first clickable step toward a healthy ride.”
Conclusion: Master Fuel Filter Access to Unlock Performance Potential
For Kawasaki Mule PRO-FXT riders, access to the fuel filter is more than a maintenance detail—it’s a performance dividend. The detailed location guide transforms a factory-encrypted step into a manageable, repeatable process, empowering both seasoned technicians and weekend warriors alike.
With precise blow-by diagrams, location snapshots, and actionable troubleshooting, maintaining this vital component becomes seamless. In the demanding world of off-road and heavy-duty riding, knowing where the filter lives ensures every journey starts with confidence—and runs


Related Post

How Old Is Meghan Markle? Tracing the Timeline of a Modern Royal

David Bromstad Twin Unveiled: The HGTV Star Whose Journey Redefines Modern Home Design

PUPNS BKN GO ID: Your PNS Profile Guide

Unlocking Fiscal Discipline: Your Essential Guide to the OSCPESSIESSC Finance Commission